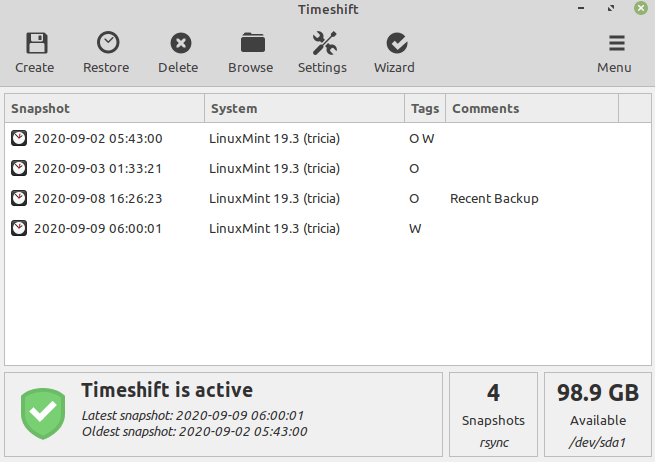
הנושאים

The Ranger File Browser 

הסרטון  /  האתר  /  

Installing Zoneminder on Debian 11                       ( camera system )            video  ,  site

התקנת ARCH LINUX ב 5 דקות

סרטון  /  github ArchTitus  /  לינק

התקנת עורך טקסט MARK TEXT

סרטון,     להורדה,     ל ARCHLINUX

התקנת לינוקס מומלצת לפי DT       הסרטון \ דף להורדת הקובץ התקנה

התקנת לינוקס על כונן USB       ArchInstallOnUSB  \   סרטון הסבר \ UEFI & Legacy BIOS On a USB Stick \  טקסט להתקנה

תמיכה בפורמט NTFS בלינוקס – במערכת ARCH-LINUX                  sudo pacman -S ntfs-3g    

התקנה של VM חדש בלינוקס          Virtual Machine Setup for QEMU in Linux              הסרטון הסבר  

התקנת שרת סרטים בשידור חי  Ant Media Server

סרטוןgithub  \  הוראות התקנה  \ גישה למותקן 98  \ גישה למותקן ב linod  \  גישה לדומיין

אפליקציות להתקנה

How to Install libreoffice-l10n-he in Ubuntu 18.04


Install libreoffice-l10n-he by entering the following commands in the terminal:

sudo apt update
sudo apt install libreoffice-l10n-he

Description:

office productivity suite — Hebrew language package


LibreOffice is a full-featured office productivity suite that provides a near drop-in replacement for Microsoft(R) Office. . This package contains the localization of LibreOffice in Hebrew. It contains the user interface, the templates and the autotext features. (please note that not all this is available for all possible languages). You can switch user interface language using the locales system. . Spelling dictionaries, hyphenation patterns, thesauri and help are not included in this package. There are some available in separate packages (myspell-*, hyphen-*, mythes-*, libreoffice-help-*) . If you just want to be able to spellcheck etc. in other languages, you can install extra dictionaries/hyphenation patterns/thesauri independently of the language packs.


very easy:

1) FIRST SELECT THE TEXT
2) go to FORMAT –> paragraph
3) choose options like in the picture


Google Chrome
 is the most widely used web browser in the world. It is fast, easy to use, and secure browser built for the modern web.

Chrome is available for all major operating systems and hardware platforms and allows you to synchronize your bookmarks, history, and passwords on all your devices.

This article explains how to install the Google Chrome web browser on Ubuntu 20.04.

Installing Google Chrome on Ubuntu

Chrome is not an open-source browser, and it is not included in the standard Ubuntu repositories. Installing Chrome browser on Ubuntu is a pretty straightforward process. We’ll download the installation file from the official website and install it from the command-line.

Perform the following steps to install Chrome browser on your Ubuntu system:

1. Downloading Google Chrome

Open your terminal either by using the Ctrl+Alt+T keyboard shortcut or by clicking on the terminal icon.

Use wget to download the latest Google Chrome .deb package :

wget https://dl.google.com/linux/direct/google-chrome-stable_current_amd64.deb

2. Installing Google Chrome

Installing packages on Ubuntu requires administrative privileges. Running the following command as a user with sudo privileges to install Chrome .deb package on your system:

sudo apt install ./google-chrome-stable_current_amd64.deb

When prompted, enter your user password, and the installation will start.

At this point, you have Chrome installed on your Ubuntu system.


Starting Google Chrome 

In the Activities search bar type “Google Chrome” and click on the icon to launch the application:

Chrome can also be launched from the command-line by typing google-chrome.

 
Cover image for How to Use Timeshift from Command Line in Linux

How to Use Timeshift from Command Line in Linux

 ・Updated on  ・2 min read

What is Timeshift?

Timeshift is a great tool, which monitors your system & application-level changes and gives you the ability to roll back your system in the previous state, in case, you run into a problem (Similar like Windows restore point)

Timeshift

Why should you use the Timeshift from the Command line/Terminal when you have a GUI version?

Well, using the timeshift in GUI mode is absolutely fine. Nothing to complain here. However, imagine a situation, where your video driver is broken due to some unstable update or maybe something terrible happens with your system and you are not able to use the Timeshift GUI version to rollback your system to the previous state, then you have only the Timeshift CLI option available.

How to use Timeshift from the command line?

At first, make sure that the timeshift is installed in your system. If not, then install it using sudo apt install timeshift

Creating a Restore point

Now, launch your terminal and type the following command

sudo timeshift --create --comments "A new backup" --tags D

Restore Point

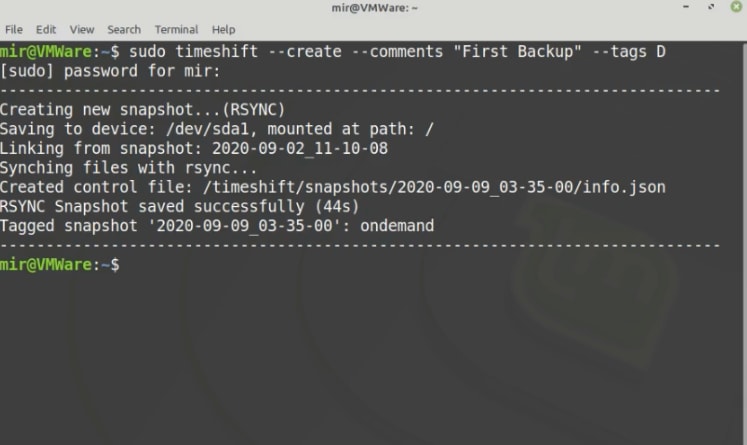
(Creating a restore point/snapshot may take several minutes, depends on the size of the files & your hardware resources)

-- comments "A new backup"

You can write anything as a comment, it doesn't matter that much.

--tags D

There are several tags, that specify what kind of backup it is.

As an example

--tags D stands for Daily Backup

--tags W stands for Weekly Backup

--tags M stands for Monthly Backup

--tags O stands for On-demand Backup

You can put any tag as your wish, after the comments

Restoring a snapshot

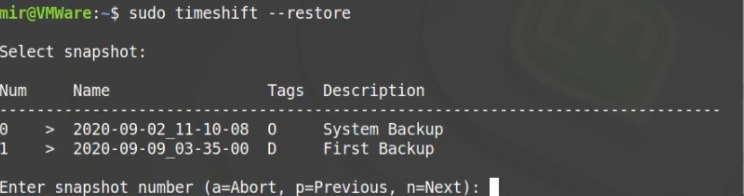
sudo timeshift --restore

This command shows you a list of created snapshots & ask, from which snapshot you want to restore the system, you have to select the snapshot index to proceed further

snapshot_list

After that, press the Enter key to continue, when It asks about reinstalling the GRUB2 bootloader, press the 'y' key, then press the Enter key again & finally, press the 'y' key to start the system restore…

list_2

list_3

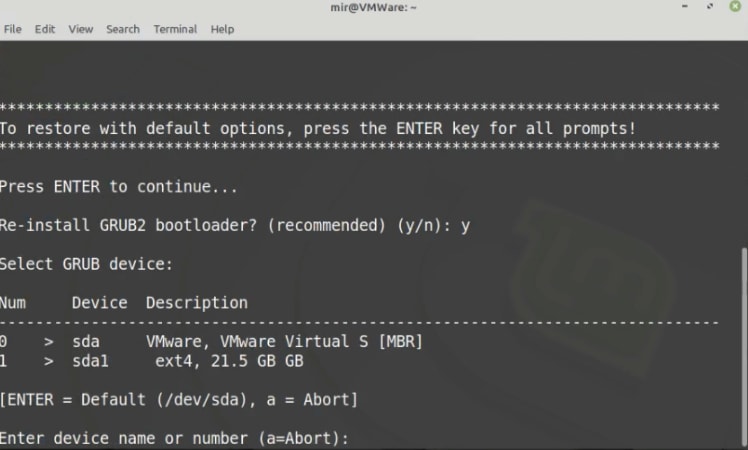
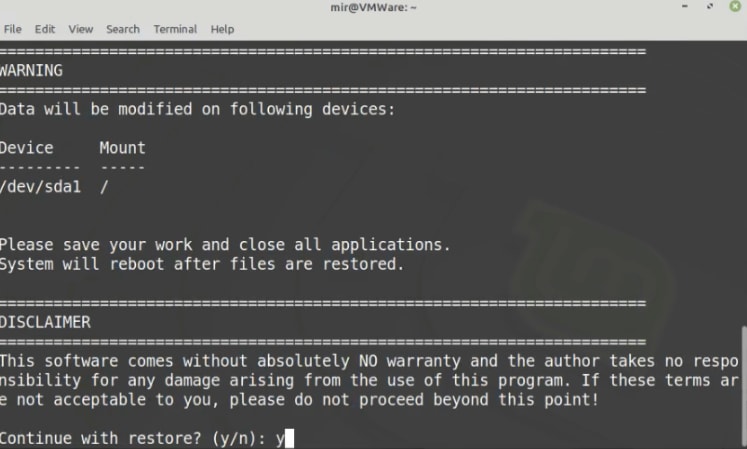
At this moment, you have restored the system successfully, and the PC will take a reboot to ensure that your restoration is fully done.

(**When your PC is in the restoring phase, don't do any work. It might interfere with the restoring process.)

Watch on YouTube

Thanks for the reading 🙂

Coffee https://www.buymeacoffee.com/rahedmir

pacman -Sy git
git clone https://github.com/ChrisTitusTech/ArchTitus
cd ArchTitus
./archtitus.sh